
you may have noticed how lovely things look around here. thanks to one of my dearest friends, jill, green tea and kimchi has a smart new look. jill (aka queen blogger) has been posting about her life every single day since she arrived in korea four years ago. she sees the good in every day and is just plain lovely so it's no surprise her blog has quite the following. i recently heard a patron of our community SPACE who happens to be an avid reader of jill's blog said that mayo and i are her favorite guest stars. so funny!
jill and her husband have recently started their photography business and, as a result, mayo and i have some beautiful photos we will cherish forever... the last photos before we were 'three' :) so not only is she a well-known blogger, a talented photographer and a beautiful woman inside and out, jill also happens to be super crafty and quite saavy with a needle and thread. when i saw an article about up-cycling old sweaters into baby hats, i knew just who to commission for the job. and saw it as perfect timing for green tea and kimchi's first guest post! enjoy...
and thank you, auntie jill!
jessica
It's true... This baby beanie used to be a skirt!

I was so honored and excited when Jess asked me to be a guest blogger! My name is Jill, by the way, and Jess and I met almost 4 years ago in Korea and have been close friends ever since. I live in Busan, South Korea and am an English teacher, wife, avid blogger and DIY'er. So, Jess asked if I would write a guest blog post about up-cycling clothes into baby clothes!
As you may or may not know, Jess is just weeks away from having her 1st baby, which I KNOW is a boy! (She and Mayo have chosen not to find out the sex, but I just know it's a boy! And I've lovingly nicknamed him Leyloa, which is a mix of a boy name and girl name I like.) So, when my husband and I were in Seoul a couple weeks ago, Jess asked if I could sew a baby beanie out of this knit skirt she doesn't wear anymore! I thought, sure, why not?! I was thrilled to have a project to work on and even more excited that it would be for Leyloa!
So, here's the original skirt I worked with. Cute, huh?!

First, I measured the bottom and cut at the 13 inch mark.

Then I measured 7 inches from the bottom to the top and cut across,
making a 7 inch by 13 inch rectangle.
making a 7 inch by 13 inch rectangle.

Then, I took one of my own beanies and laid it on a piece of paper and traced the shape. I made sure to lay it 6 inches from the bottom of the paper, because that's how tall our lil newborn beanie will be.

Then, I folded the striped fabric over and laid my paper template on top.

I took a blue marker and traced a line around the paper template and then stapled the fabric together, so it didn't move when I was sewing along the line.

Then, I took some white thread and went to town, sewing along the line. SO EASY, right?!

After I was finished with the original stitching, I cut all of the excess fabric off. Then, I folded the beanie so that the two sewn edges were touching at the bottom and sewed a + shape into the top of the beanie. This is imperative!! If you skip this step, it'll fit really funny on the baby's head!

Then, I turned it right side out and voila - I had myself a newborn beanie, made from a knit skirt!

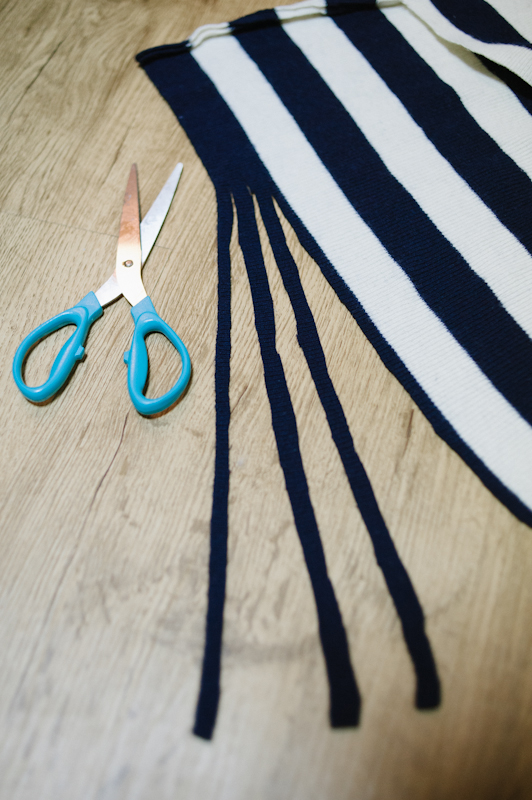
But wait, you can make it even MORE adorable! Jess asked me to adorn it with a pom pom, which I thought was genius! So, I cut these three strips of blue fabric (about a 1/4 inch wide and about 1 1/2 feet long. They don't have to be perfectly straight. YAY!
Then I wrapped those strips around 3 fingers.

I gently pulled them off my hand, laid them on the floor, took some matching thread and tied them tightly in the middle. Then, I cut the ends of the loops, fluffed them up a bit into a ball shape, and ... I had myself an adorable pom pom. I grabbed the same blue thread, turned the beanie inside out and sewed it right on to the top. That's it! I was finished! How easy is that?!

Remember that original beanie I used to create my paper template? Well, I cut that one down and created another newborn beanie for Leyloa! I can knit, but not this type of pattern... So by cutting my own beanie, which has been sitting in my closet for 3 years untouched, I could give Leyloa a knitted beanie without ever knitting anything!

Last but not least, I was going through my clothes, since my husband and I will be finally leaving Korea next month (after 4 years) and found some Thai wrap around pants that Jess, Mayo and I all bought when we were in Thailand together back in 2009. I have a couple different pairs, so I grabbed the blue ones and went to town, using the fabric to re-create a smaller version for the Leyloa! I think they turned out pretty darn cute! There's a draw string type of thing under the fold over, so they'll fit him for at least the 1st year!

So, the next time you're pitching your sweaters, knit skirts and beanies, think again! Everything can be recycled - or "up-cycled" as they say. You just need to use your imagination, a little needle and thread and a bit of patience!
- Jill


